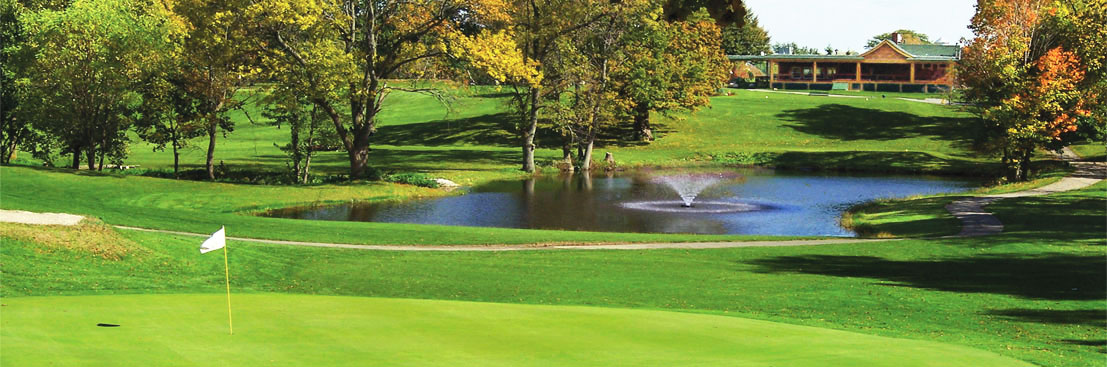
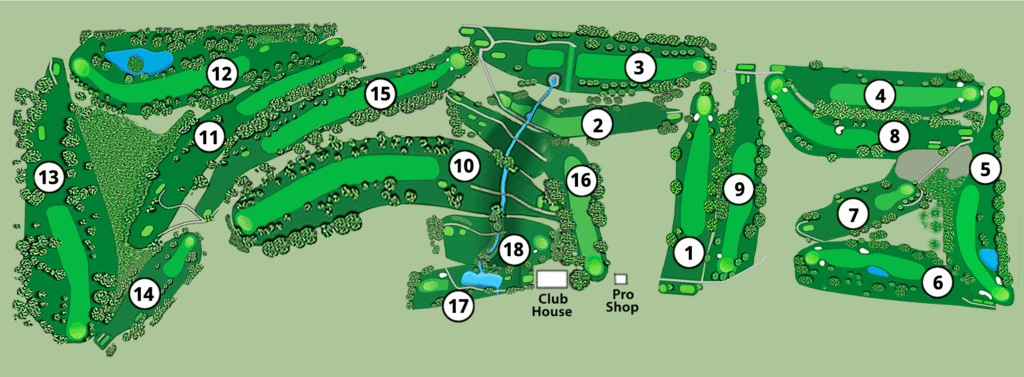
Hole 1
Par 4
A good hole to begin a round of golf. If you are using the blue tee, the large tree on the left may present a challenge. Keep away from the cluster of trees on the right side of the fairway. There is plenty of green to work with. It slopes down from back to front with a drop behind the back of the green.
| Blue | 330 yds |
| White | 320 yds |
| Red | 300 yds |
Hole 2
Par 4
Hole 2 has a slight dog leg to the right. Drives around 250 yards will have to contend with the creek. Shorter drives that go to the right can lead to a blind second shot. If your second shot goes over the green, you will find that the hole becomes much more challenging. You will be pitching from above the hole and the green tends to run pretty fast so you may find your shot running off the green.
| Blue | 310 yds |
| White | 292 yds |
| Red | 282 yds |
Hole 3
Par 5
Hole 3 is the single par 5 hole on the front nine and you can just hit straight away. This can be a tough hole if your drive goes off to the left as you will probably lose your ball in the rough. A berm runs along the full width of the hole. If you can drive over the berm you will find the hole is much easier to par. The green is a generous size and slopes down from back to front.
| Blue | 509 yds |
| White | 465 yds |
| Red | 401 yds |
Hole 4
Par 4
A straightforward hole, the green is partially hidden by a group of trees. If you venture into the rough on either side of the fairway, you may find that trees can present a problem. There are deep bunkers on either side of the green. A third bunker lies behind the back of the green which you will almost certainly go into if you overshoot the green. The green slopes down from back to front.
| Blue | 380 yds |
| White | 357 yds |
| Red | 347 yds |
Hole 5
Par 4
Hole 5 has a dog leg to the left. If you drive to the left of the fairway, you may have difficulty getting on the green with your second shot due to the trees that are likely in your way. Wayward drives to the right can land in the marsh and be all but impossible to find. There are deep bunkers on either side of the green. The green slopes quite sharply from upper right to lower left. Putts will often break more than you might expect.
| Blue | 363 yds |
| White | 353 yds |
| Red | 327 yds |
Hole 6
Par 4
Hole 6 is one of the easier ones on the course and gently curves from right to left. Better golfers may be tempted to go over the water directly toward the green but it’s risky. The best place for your drive on Hole 6 is between the water on the left and the bunker on the right. The greenn is easy to reach in regulation from that point. The green is fairly generous in size and generally easy to read for most pin locations.
| Blue | 335 yds |
| White | 320 yds |
| Red | 300 yds |
Hole 7
Par 3
Hole 7 is the single, short and easy par 3 on the front nine. A pair of bunkers await shots that have the correct distance but miss the green to the right. Wayward shots to the left may end up in some pretty thick rough. There is plenty of green to work with. It slopes down from back to front with a drop behind the back of the green.
| Blue | 175 yds |
| White | 165 yds |
| Red | 97 yds |
Hole 8
Par 4
Hole 8 has a dog leg to the right. Trying to save distance by cutting off the right corner can lead to a very difficult second shot if your drive goes too far to the right and lands among the trees.There is a bunker halfway to the hole but it is shallow and should be easy to recover from if you land in it. The green can be deceptive in places and you may tend to under estimate the amount of break in your putts depending on the pin location.
| Blue | 385 yds |
| White | 348 yds |
| Red | 320 yds |
Hole 9
Par 4
Hole 9 curves slightly from left to right. Stray drives, either to the left or right can lead to a very difficult second shot if your drive lands among the trees. Most likely you will need to punch out to the fairway. The green has a significant downward slope from back to front. Putts from the top of the green can easily roll off the front. If you are putting cross green, it can be quite challenging to figure out the amount of break that is needed.
| Blue | 350 yds |
| White | 345 yds |
| Red | 337 yds |
Hole 10
Par 5
Hole 10 is the first of three par 5 holes on the back nine. There is a pretty deep ravine that you will have to drive over. There is a cluster of trees on the left side of the fairway roughly about 200 yards from the green. Avoid these if at all possible. There is plenty of green to work with whichh generally slopes down from back to front and putts often roll down farther than expected.
| Blue | 565 yds |
| White | 545 yds |
| Red | 406 yds |
Hole 11
Par 4
Hole 11 is the longest par 4 on the course with a slight dog leg to the right. If you attempt to shave off yardage with your drive, the trees on the right can yield a difficult second shot. The green is generous and mostly easy to read although some pin placements can provide you with challenges.
| Blue | 470 yds |
| White | 385 yds |
| Red | 375 yds |
Hole 12
Par 5
Hole 12 is a pretty hole to play and is the second par 5 on the back nine. The hole has a slight dog left to the right and is the shortest of the par 5s. The pond and two bunkers on the right should deter you from trying to cut corners. The green is a generous size and slopes down from back to front. It is fairly easy to get a good read for putting.
| Blue | 490 yds |
| White | 470 yds |
| Red | 405 yds |
Hole 13
Par 4
Hole 13 is a very straightforward par 4 hole and one of the easier holes on the course. The hole favors nice straight drives. As long as you keep your ball away from the woods on the right, you should have little trouble keeping your ball in play. The green is very reachable in regulation. The green is large but it is fairly easy to get a good read on your putts as there is not a great deal of break in most putts.
| Blue | 415 yds |
| White | 337 yds |
| Red | 307 yds |
Hole 14
Par 3
Hole 14 is the longest par 3 on the course but apart from the distance involved with the tee shot, the play is straightforward. The green is a generous size and slopes down from the back to the front. If a shot goes over the green, the next shot can be somewhat tricky.
| Blue | 227 yds |
| White | 197 yds |
| Red | 177 yds |
Hole 15
Par 5
Hole 15 is the last of the par 5s with a fairway that curves gently to the right. If your drive goes to the right and into the trees, there is a good chance you will be in for a tough second shot. There is plenty of green to work with. Depending on the pin placement, reading some long putts can be a challenge as they break more than expected. Putts from the back of the green can be particularly difficult and three putts are not
| Blue | 564 yds |
| White | 530 yds |
| Red | 410 yds |
Hole 16
Par 4
Hole 16 has a fairly sharp dog leg to the right with the green not visible from the tee. Like the 10th hole there is a pretty deep ravine that you have to drive over. If your drive is short, you have a steep uphill lie for your second shot and probably will not have a clear shot to the green. If your drive goes past the fairway on the left, trees will make your second shot difficult. The green is a generous size and slopes down from back to front.
| Blue | 358 yds |
| White | 309 yds |
| Red | 273 yds |
Hole 17
Par 3
Hole 17 is a very pretty par 3 hole that requires you to hit over a pond. If you miss the green there is very little fairway to work with although most locations enable you to get on the green with your next shot. The green is a good size but some pin placements can make you work to get a good line on your putts.putting from the top of the green can be tricky because of its downward slope.
| Blue | 175 yds |
| White | 170 yds |
| Red | 140 yds |
Hole 18
Par 3
The last hole is a par 3 that requires you to hit over the same ravine as hole 16. If your drive falls short, you will have a very steep uphill lie and may not be able to see the pin for your next shot. If your drive lands on top, it is easy to have it carry too far and roll into the burm than runs behind the green. There is plenty of green to work with which generally slopes down from back to front.
| Blue | 178 yds |
| White | 165 yds |
| Red | 154 yds |